
Proper hand wrapping is the foundation of safe and effective boxing training. When you strike a heavy bag, focus mitts, or an opponent, your hand absorbs a tremendous amount of force that can easily displace the small bones and joints in your wrist and fingers. Using a high-quality pair of Hayabusa hand wraps provides the structural support needed to keep your hand aligned, reducing the risk of acute sprains, fractures, and chronic strain. By mastering the correct wrapping technique, you ensure that every punch distributes impact evenly across your knuckles and wrist, allowing you to train consistently and with full confidence.
Why Proper Hand Wrapping Matters in Boxing
The human hand contains 27 small bones, numerous delicate ligaments, and complex joint structures that are not naturally designed to withstand repeated high-velocity impacts. While a boxing glove provides external cushioning, it does not prevent the individual bones in your hand from shifting or your wrist from bending awkwardly upon impact. Hand wraps act as a supportive cast, binding these structures together so they function as a single, solid unit.
Relying solely on the built-in padding of your boxing gloves is a common mistake that can lead to injuries like a boxer’s fracture or severe wrist hyperextension. This is especially true during heavy bag work, where the resistance is unforgiving, or during high-intensity sparring sessions. The wrap fills the empty spaces inside your glove, ensuring a snug fit that prevents your hand from sliding around, which can cause painful friction burns and joint misalignment.
Products mentioned in this guide
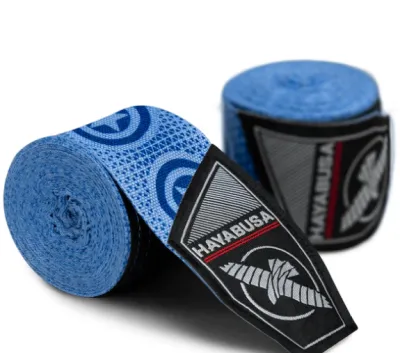
Prices are valid at publication and may change. Please refer to the product page for the latest price.
Hayabusa hand wraps utilize a semi-elastic, stretchable fabric blend—often referred to as Mexican-style wraps—which offers a distinct advantage over rigid cotton wraps. This material conforms closely to the unique contours of your hand, allowing you to achieve a highly customized level of tension. The breathable weave helps manage heat and moisture during intense training sessions, ensuring your hands remain comfortable and secure without losing support as you sweat.
What You Need Before You Start
Before beginning the wrapping process, select a pair of Hayabusa hand wraps that measure 180 inches (approximately 450 cm) in length. This standard adult length is essential because it provides enough material to thoroughly cover your wrist, knuckles, thumb, and the spaces between your fingers. Shorter wraps often force you to compromise on protection, leaving either your wrist or your knuckles vulnerable.

Ensure your hands are clean and completely dry before you begin wrapping. Any residual moisture on your skin can cause the fabric to slip, bunch up, or create friction points that lead to blisters inside your gloves. Working with dry hands also prevents moisture from transferring directly into the Velcro closure, which can weaken its grip over time.
Prepare your wrap by unrolling it completely and laying it flat, or hold the rolled wrap securely in your opposite hand. Starting with a tangled or twisted wrap will disrupt your rhythm and force you to apply uneven tension. Taking a moment to straighten out the fabric ensures a smooth, continuous application from the thumb loop to the final Velcro fastener.
Step-by-Step Guide to Wrapping Your Hands
The core philosophy of hand wrapping is simple: anchor the wrist, pad the knuckles, and lock the thumb. Each step builds upon the previous one to create a structural support system that moves naturally with your hand. The goal is to create a wrap that is firm and protective when you close your fist, yet relaxed and comfortable when your hand is open.
Throughout the entire wrapping process, keep your hand in a relaxed position with your fingers spread slightly apart. If you wrap your hands with your fingers pressed tightly together, the wrap will become excessively tight and constrictive when you make a fist during training. Spreading your fingers ensures that the wrap accommodates the natural expansion of your hand muscles under tension.
Before making your first loop, locate the “This Side Down” indicator on your Hayabusa wrap. This ensures that as you progress through the steps, the Velcro closure at the very end will face the correct direction to fasten securely. Laying the wrap flat with the correct side facing your skin prevents you from having to twist the fabric at the end to make the Velcro stick.
Step 1: Anchor the Wrist with the Thumb Loop
Begin by placing your thumb through the loop at the end of the wrap, ensuring the fabric runs across the back of your hand rather than your palm. Starting across the back of the hand is a crucial safety detail; it pulls the wrap tight against your wrist when you make a fist, rather than pulling your thumb downward into an awkward, injury-prone position.
Wrap the fabric around your wrist two to three times, maintaining a consistent, moderate tension. This initial anchoring phase establishes the foundation for your entire wrap, providing the necessary resistance to keep your wrist joint stabilized during straight punches and hooks.
Position the wrap so that it sits just above the wrist joint, covering the base of your palm slightly. It should not slide too far down your forearm, as this leaves the actual joint unsupported, nor should it sit so high that it prevents you from bending your hand forward slightly when executing proper punching form.
Step 2: Build the Knuckle Padding
From the wrist, bring the wrap diagonally up across the back of your hand to the outer edge of your pinky knuckle. Run the wrap straight across your knuckles, wrapping them three to four times to build a thick, protective cushion. This padding absorbs the direct impact of your punches, shielding your knuckles from bruising and skin abrasions.
Keep your fingers spread wide as you wrap the knuckles to prevent the fabric from bunching together and creating a narrow, uncomfortable ridge. The layers should lie flat and overlap slightly, covering the entire striking surface from the index finger to the pinky.
For added stability, you may choose to run the wrap between your fingers, starting from the pinky space and working toward the index finger. Each pass between the fingers should go down to the base of the hand and then wrap around the wrist to lock it in place. This technique keeps the knuckle padding from sliding backward during heavy impact and helps absorb sweat between your fingers.
Step 3: Lock the Thumb and Secure the Wrist
After securing the knuckles, bring the wrap down diagonally across the back of your hand and loop it once around the base of your thumb. This step is vital for preventing hyperextension, which commonly occurs if a punch lands at an incorrect angle or slips off a wet target.
Once the thumb is anchored, wrap the fabric back around your wrist to lock the loop in place, then bring it diagonally up across the back of your hand to form an “X” pattern. This cross-hand wrapping technique binds the knuckle padding and the wrist support together, creating a unified structure that distributes force efficiently.
Alternate your wrapping path between the wrist and the hand to distribute the tension evenly. Avoid pulling the fabric too tightly during the thumb lock, as the skin around the thumb web is highly sensitive and prone to chafing if the wrap is applied with excessive force.
Step 4: Finish and Fasten the Velcro
Use any remaining length of the wrap to add extra support where you feel you need it most. If you have a history of wrist weakness, focus the remaining loops around your wrist joint; if you require more impact absorption, add another layer over your knuckles.
Bring the wrap down to your wrist for the final turn and secure the hook-and-loop Velcro closure. Ensure the Velcro sits flat against your wrist without any folded corners or exposed hooks that could scratch your skin or damage the inner lining of your boxing gloves.
When finished, the Hayabusa logo on the strap should be clearly visible and facing outward. This indicates that you have applied the wrap correctly from start to finish without twisting the fabric, resulting in a clean, professional appearance and a secure hold.
How to Check if Your Wraps Are Correct
Once you have finished wrapping both hands, perform the “fist test” to verify the fit and tension. Open your hand completely; the wrap should feel snug but not tight, allowing your skin to breathe and your fingers to move. Now, close your hand into a tight fist; the wrap should immediately tighten, forming a solid, rigid protective layer over your knuckles and a firm support around your wrist.
Test your wrist mobility by gently flexing your hand forward and backward. Your wrist should feel heavily supported, resisting extreme angles of flexion, but still allowing the slight natural adjustments needed to align your forearm with your knuckles when punching. If your wrist bends too easily, the wrap is too loose; if you cannot move it at all, it may be too restrictive.
Monitor your hands closely for signs of restricted blood circulation, such as tingling, numbness, cold fingertips, or skin turning pale or blue. If you experience any of these symptoms, do not attempt to train through the discomfort. Immediately unroll the wraps and reapply them with slightly less tension to prevent nerve compression or vascular issues.
Common Wrapping Mistakes to Avoid
One of the most frequent errors is wrapping over the thumb joint itself rather than around its base. Wrapping too high on the thumb restricts your ability to form a proper fist, forcing your hand into an unnatural shape inside the glove and increasing the risk of joint strain.
Another common mistake is allowing the wrap to twist or fold as you apply it. Twisted fabric creates localized pressure points that can dig into your skin, causing painful bruises and blisters under the force of your punches. Always keep the wrap flat and smooth out any wrinkles as you progress.
Avoid applying uneven tension throughout the wrap, such as wrapping the wrist loosely but pulling the knuckle sections extremely tight. This imbalance causes the wrap to shift and bunch up inside your glove during training, rendering the protective elements ineffective and requiring you to stop your workout to rewrap.
Caring for Your Hand Wraps in a Tropical Climate
In Singapore’s hot and humid climate, proper maintenance of your hand wraps is essential for both hygiene and gear longevity. Sweat, bacteria, and dead skin cells accumulate rapidly in the fabric during a workout, creating a breeding ground for unpleasant odors and mold if left unwashed. Wash your wraps after every training session to keep them fresh and hygienic.
To wash your wraps without damaging them, place them inside a mesh laundry bag to prevent them from tangling around other clothes or the washing machine agitator. Use a mild detergent and a gentle cycle with cold water, as hot water can degrade the elastic fibers in the semi-elastic material. Avoid using bleach, which weakens the fabric structure over time.
Hang your wraps to air-dry in a well-ventilated indoor area or in shaded outdoor spaces. Avoid exposing them to direct, harsh sunlight for extended periods, as intense UV rays can dry out and degrade the Velcro closure and weaken the elastic fibers. Once completely dry, roll your wraps tightly starting from the Velcro end, keeping them organized and ready for your next training session.
Frequently Asked Questions (FAQ)
How long should my Hayabusa hand wraps be?
For most adults, the standard 180-inch (450 cm) Hayabusa hand wraps are the recommended choice. This length provides ample material to properly execute all the necessary protective steps, including wrist support, knuckle padding, and thumb locking. Shorter wraps, such as 120-inch variations, are generally designed for children, individuals with exceptionally small hands, or specific quick-wrap styles that offer minimal coverage.
Should I wear hand wraps under MMA gloves?
Yes, wearing hand wraps under MMA gloves is highly recommended, especially during heavy bag training or hard sparring sessions. Because MMA gloves have significantly less padding than standard boxing gloves, your hand bones are exposed to higher impact forces. However, due to the open-finger design and smaller profile of MMA gloves, you may need to use a slightly shorter wrap or a specialized wrapping style that leaves the palm open to maintain your grappling grip and dexterity.
How often should I replace my hand wraps?
You should replace your hand wraps when they no longer provide reliable support or when the materials begin to degrade. Common signs that it is time for a new pair include a permanent loss of elasticity, frayed edges, a worn-out Velcro strap that slips during training, or persistent odors that remain even after washing. For someone training two to three times a week, a quality pair of wraps typically lasts between three to six months before needing replacement.
Community discussion
Share your experience or ask a question. Comments are reviewed before publication.